
Vinyl records can sound amazing. That’s why so many Hi-Fi enthusiasts (Audiophiles) love the format. Myself included.
But vinyl can also sound really bad.
Dirty records full of static electricity played on a turntable with a worn out stylus and every alignment fully out of whack will probably not be a pleasant musical experience.
But if we avoid a few basic mistakes, vinyl records shall and will sound good.
It is important to get the basics right to enjoy vinyl the way it should. Fortunately, the vinyl basics are quite basic.
And when the vinyl basics are locked in, there is an ocean of possibilities to keep on tweaking and upgrading your vinyl setup to make the sound go from good to truly amazing.
The sky is the limit in the world of analog music reproduction!
The first aim of this article is to give you some easy tips for how to make your vinyl sound as they should. The basics.
Records that pop and crack and fill the music with all kinds of unwanted noises will be history.
The second aim of this article is to give you the very best next-level tips on how to take the vinyl sound quality and vinyl musical experience from good to truly amazing.
Tips you can take with you and implement one by one when the timing is right.
Some tips are free to implement. And some will cost a lot of money.
I have split the 27 tips to make your vinyl records sound better into four main categories:
- Take good care of your vinyl
- Improve your listening room acoustics
- Win the fight against static electricity
- Upgrade your turntable and HiFi gear for improved sound quality
Without further ado, let’s dive into it!
Category 1: Take good care of your vinyl
The first six tips are all about making sure that your vinyl records are in perfect condition. Which is equally important for the occasional vinyl listener as for a hard-core stereophile vinyl enthusiast.
Tip 1: Never touch the grooves (And wash your hands)
Vinyl records full of fingerprints and grease will never sound good. Not even on a million-dollar Hi-Fi stereo.
The first rule of vinyl is to never touch the grooves. To avoid grease and fingerprint to be transferred from your hands to your records.
When handling vinyl, make sure to only touch the label or the edges. And make sure that your hands are reasonably clean. If you are on the middle of a tasty taco dinner, it might be wise to let your favorite records stay in the cover until the dinner is over.
Records should be clean when put on play. And clean when put back into storage. Vinyl that is put into storage in a dirty condition, will be much harder to get clean after the dirt has been given time to harden.
Tip 2: Dry clean your records to remove dust and particles
Before every play, it is wise to dry clean the record with a vinyl cleaning carbon fiber anti-static record brush.
This is the one I use.
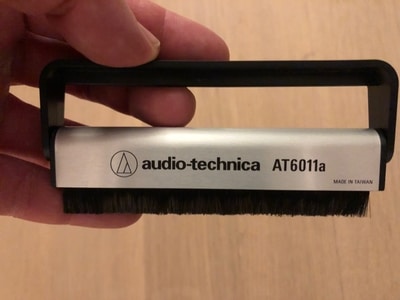
This brush will remove dust and particles so that the pops and crackles are highly reduced compared to a dusty record.
I just start the motor so the record is spinning and gently pushing the brush on the record while slowly moving the brush from the records outside edge towards the record center.
The process only takes a few moments.
Make it a habit to use a brush like this before every play. Just as brushing your teeth at night before bed. And your records will sound a lot better.
If you don’t have a carbon fiber brush in the house, a microfiber cloth can also be used to dry clean records. Just make sure the cloth is clean.
Tip 3: Wet clean your records to remove grease, dirt, and fingerprints
From time to time, it is necessary to give our records a more thorough cleaning than just a dry cleaning with a carbon fiber brush.
It is not necessary to do this before every play. But it is wise to do this before the first play of a newly bought record (new or used) and from time to time when we can visually see with our eyes that the record is dirty. Or when the record starts to sound noisy and a quick dry clean won’t do the trick.
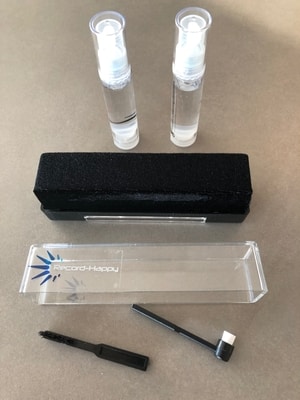
I use the Record-Happy record cleaning velvet brush to wet clean my records and it has been working great. It comes in a package with a velvet brush, cleaning solution and a stylus brush.
Always use a cleaning solution that is developed for record cleaning. If you use basic household cleaning products, things can potentially get worse as some of those products will leave small parts of residues in the grooves, which will cause problems.
Also, never use alcohol to clean records. If done repeatedly, alcohol will deteriorate the outer protective layer of the record and will make the record more fragile to wear and tear when played.
Tip 4: Store your records standing up
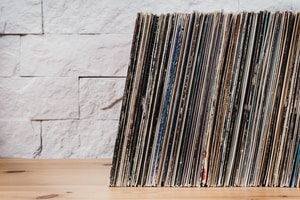
If records are stored horizontally on top of each other in a stack, they can get warped and damaged. Vinyl is heavy and the records in the bottom of a pile will be put under more pressure than they can handle. This is especially true if the records are piled up in a hot room or in direct sunlight. As vinyl gets softer with higher temperatures.
To avoid this, make sure to always store your records vertically. A record crate or a bookshelf is perfect for this. Even an old wine case will work fine. It is ok to be creative with the furniture used, but make sure the records are standing up, have some air to breath (don’t stack them too tightly together) and that they are stored way clear of direct sunlight or radiators that will put them into heat.
If you are interested, you can read my full article on record storage here.
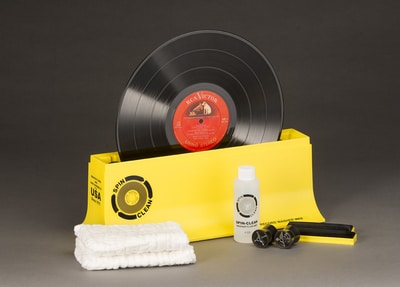
Tip 5: Use a record cleaning machine to give the grooves an even better rinse
To really take your record cleaning to the next level (enthusiast level), a record cleaning machine might be a worthwhile investment.
I still don’t own one myself as a write this article, but it is definitely on my Amazon wish list.
These machines are known to give an even better cleaning than the standard wet cleaning with a velvet brush mentioned in an earlier tip. They are also known for being effective at removing static electricity from records, which is a nice bonus.
From the research I have done, the Spin-Clean Record Washer MKII Complete Kit is the cleaning machine that gives the most value for money. It seems to be really popular and well reviewed.
Tip 6: Invest in good quality aftermarket inner sleeves
The paper inner sleeves that normally come standard with most albums are not absolutely ideal for your records. They can scratch your records (at least in theory) but their biggest drawback is that they don’t deal too well with static electricity.
When a record is static, it will attract dust and particles, so keeping the build-up of static electricity in our records to a minimum is important.
There is a whole category on how to deal with static electricity below, but for this tip, the essence is that good quality inner sleeves will reduce static which again will reduce dust and particles on our records.
There are many good quality inner sleeves to choose from, but the ones that get the most praise seem to be the ones from Mobile Fidelity.
Category 2: Improve your listening room acoustics
In the section above, the focus was on how to take care of our records so that they always are clean and in top notch condition.
In this section, we’ll take an in-depth look on how we can improve sound by improving the acoustics of the room we use to listen to vinyl.
Improving listening room acoustics is probably something that is often overlooked.
But being passionate about sound quality and HiFi for most of my life, I have learned over and over again how important good acoustics is for a HiFi stereo setup to sound good.
Some of the measures in this category are really simple and free. And some of them are a bit more advanced.
If you use headphones for your vinyl listening, then of course none the tips in this section will be too relevant for you…
Anyway, let’s jump into it.
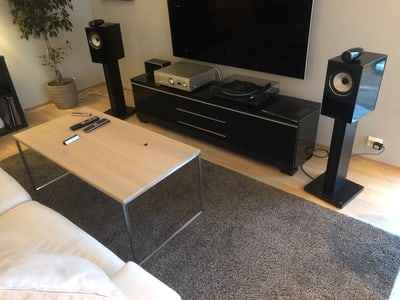
Tip 7: Move the speakers farther from the back wall
Speakers need to have some room around them to sound their best. If you place your speakers too close to the back wall, the bass will get very bloated. As you move the speakers farther from the back wall the bass will tighten up.
I place my compact 2-way speakers about 2 feet from the back wall which seems to be the sweet spot for my B&W 705s. With small speakers, like mine, we can get away with around two feet. But with bigger speakers, with larger bass drive units (10-15 in), more space will usually be necessary to make the bass sound tight and punchy.
Placing the speakers at the ideal distance from the back wall can have a huge effect on how your stereo setup sounds. Especially for the bass.
Tip 8: Create a perfect triangle

To achieve the optimal soundstage width and depth, the listening position and the speakers should form a triangle as shown in the illustration above.
The listening position shall ideally be in the center line between the speakers. And the distance from the listening position (your ears) to each speaker should be equal to the distance between the speakers. (Or a tiny bit longer.)
By setting up your stereo this way, the musicians that play the different instruments on the recording you listen to will be spaced out in depth and with, creating a more “real life” music stage and musical experience.
To really achieve an accurate soundstage, both the recording quality of the record and your stereo must be of at least decent quality. So this is a probably a tip for the slightly more advanced vinyl listener.
Tip 9: Improve acoustics with furniture
You’ve probably noticed how cold and full of echo the sound is in a totally naked room. Like when you are moving into a new house etc. Even when speaking on the phone, the person on the other end can easily pick up if the room on your end is totally empty. The sound characteristics will be very different from a room that is filled with furniture.
So just by adding basic furniture to an empty room, the sound will become much warmer and more dampened.
If your turntable and stereo is placed in a room with little furniture and a lot of naked wall area, your records will probably never sound ideal. There will be a lot of sound reflections and standing sound waves that will make the music sound cold and harsh.
So the most basic tip on improving room acoustics is to fill the room with normal basic furniture. If your turntable is set up in your living room, this is probably not an issue. But if you have a (more or less) dedicated room for music listening, make sure the room is not too empty.
Tip 10: Improve acoustics with plants
Large green plants are good for improving acoustics. They work as both absorbers and diffusors. They also look good, clean the air and provide a little bit of humidity to the air. Which, as we will get more into in a bit, reduces static electricity.
So adding a plant or two to your vinyl listening room is a good idea.
Tip 11: Improve acoustics with bookshelves
Bookshelves (ideally open and filled with books…) are great absorbers of sound. Adding a bookshelf to a naked wall is perfect for improving acoustics.
The KALLAX series from Ikea is my favorite as it is not too expensive, looks great, come in many colors and is perfect for storing records as well as books and many other things.
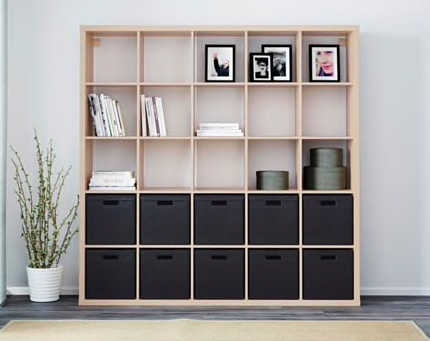
If you have an Ikea nearby and looking to improve your listening room acoustic (and record storage), it might be worth to check out this one.
I am not getting paid by Ikea by the way…
Tip 12: Improve acoustics with a carpet
If the floor in your listening room is of hard materials (stone, parquet, hardwood, etc.), it might be a good idea to take measures to deal with the reflections caused by the hard floor.
Adding a thick carpet between your speakers and your listening position is a very effective way to deal with first order reflection that bounces off the floor half way between the speakers and your ears.
Here is a picture of the carpet I currently use. Yes, it is from Ikea.
Tip 13: Improve acoustics with (thicker) curtains/draperies
Heavy drapes is a good way to reduce standing waves and make a room’s acoustic character warmer.
Tip 14: Improve acoustics with acoustic foam and other professional acoustic improvement products
Alright, this is for the real hard-core acoustic enthusiast. Not very “wife friendly”.
If you get the approval from your better half (good luck) to turn the room used for vinyl listening into something that might be looking like a recording studio, then go ahead.
Using acoustic foam and other professional sound improving products is the very best way to go if good acoustics is an absolute top priority.
The benefit of this is that there are products to choose from that are developed with the sole purpose to improve sound. And that target specific problems more accurately. You can play around with acoustic foam, bass traps, absorbers, diffusers and what have you until your room have the perfect sound profile for every part of the music frequency range.
Tip 15: Turn off the lights
This one is a little on the side. But it is a cool tip!
It is amazing how turning off the lights increases the music listening experience.
The sound stage will become much clearer when our sense of sight is turned off.
Especially if you are listening to jazz or classical music.
The singer will appear just in front of you. The drummer will appear a little farther back. And the other musicians will appear beside and behind the singer in a three-dimensional configuration.
With the light on and our eyes open, the music stage will never be as clear. It might sound strange but try it yourself, and you will see what I mean.
I learned this while listening to stereo gear in a really high-end Hi-Fi store close to where I live. They have a set of listening rooms (demo rooms) with these crazy expensive stereo setups for potential customers to experience the equipment they sell. And they always turn off the lights during a demo so that their customers can fully explore the sonic performance of the equipment. It just takes the experience to the next level.
Category 3: Win the war against static electricity
Static electricity might be your worst enemy when it comes to making vinyl records sound really good. Static that is built up in the record is picked up by the cartridge and causes pops and crackles. And in addition to that, static records sucks dust and particles from the air and make it stick like glue.
Where I live, the air gets really dry in the winter time. Humidity often falls below 30% indoors. And everything gets static. Clothes. Furniture. Sheets. And worst of all, my vinyl records.
Getting rid of static electricity can be a tough fight to win at times. But below are the measures I have tried and found to work the best to fight static electricity during the dry air season.
Tip 16: Invest in aftermarket anti-static inner sleeves
There are quite a few different anti-static inner sleeves on the market that can be bought to replace the inner sleeves that come standard with the records.

The best and most popular type seems to be the ones from Mobile Fidelity.
Probably the cheapest way to reduce static issues. As a side benefit, they will take better care of your records when it comes to scratches and long time storage too.
Investing in good anti-static inner sleeves is something that every vinyl collector should consider.
Tip 17: Invest in an anti-static device
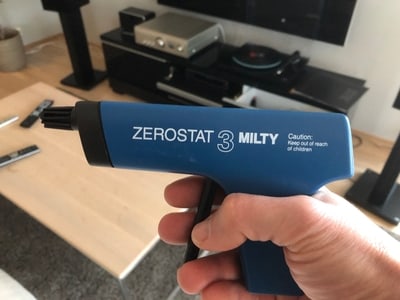
I bought the Milty Zerostat anti-static device this winter, and I am really happy with it. It definitely reduces the static build-up in records.
I give the records with static issues a few “sprays” on each side before playing them and it seems to make wonders.
It costs a bit of money, but will last a long time, so it is definitely a worthwhile investment.
Tip 18: Increase indoor humidity
The most bulletproof way to reduce static electricity is to increase indoor humidity as the moisture in the air will discharge the static electricity.
And when the air gets too dry, the static is not discharged, and it rather builds up in furniture, clothes, records and what have you.
So, indoor humidity is key.
There are many ways to do this.
Boiling water, taking a hot shower, opening a window, drying laundry, and reducing the heat from radiators/heaters are all measures that can help increase indoor air humidity.
Tip 19: Add plants
Plants have a positive effect on indoor humidity. Also, they improve room acoustics as we saw in an earlier tip.
Adding a few plants to your listening room will increase the humidity slightly.
Tip 20: Buy a humidifier
If you are really committed to eliminating static issues caused by dry air, buying an indoor humidifier might be the ultimate trick.
Actually, I went this route this winter and bought the largest indoor humidifier I could find.
This one.
Its capacity is about 10 gallons of water per day…
It worked wonders. Made my dry Sahara Desert like indoor air into Amazonas tropical humid air in a few hours.
The only problem is that it sounds like a helicopter when turned on. So I can’t really use it as much as I want.
But there are smaller and quieter humidifiers on the marked that might do the trick as well. I will definitely look for another (more silent) one as the effect on indoor air humidity is huge.
Tip 21: Buy a cork turntable mat
Replacing your felt turntable mat with one made of cork can help reduce static build-up.
Cork mats are also loved by quite a few turntable enthusiasts for their ability to reduce resonance/vibration and improve sound quality, so that might be an extra bonus.
A decent cork mat can be bought for about $20 so it is one of the cheaper measures to fight static electricity.
Category 4: Upgrade your turntable and Hi-Fi gear for improved sound quality
As we’ve seen so far, there are many ways to make our vinyl records sound better without spending any money on our stereo components per se.
The reason I put this category as the last one is that you will get much more bang for the bucks you spend upgrading your gear if you already have the other fundamentals in place. Like clean records, a non-static environment and good listening room acoustics.
With that said, is this section we will look at the most effective stereo upgrades to improve the sound of your vinyl records.
Tip 22: Get rid of that all-in-one suitcase style record player and buy standalone gear
Alright, let’s be honest. If you play your records on a $60 all-in-one suitcase style record player, you will never ever get close to extract the sonic performance from your vinyl records.
These record players are built to look cool and to be affordable. And unfortunately, not to sound good.
With tiny built-in speakers and a super low-cost tonearm and cartridge, the sound quality just won’t be good.
Please don’t hate me. I absolutely agree that they look cool and charming. And that they are convenient to use with everything in one package.
But unfortunately, to enjoy music from vinyl records fully, they won’t do a great job.
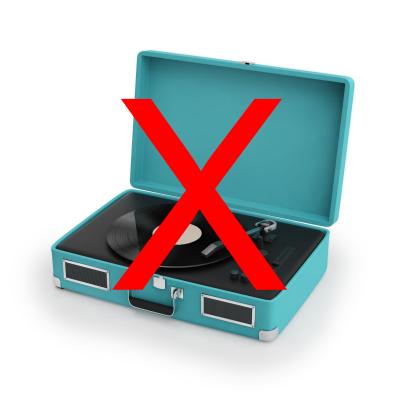
The recommended way to go is to buy standalone gear. And as a minimum, buy a standalone turntable and a set of powered speakers.
In this article I write about what I believe is the best cheap way to start listening to vinyl records.
And in this article I write about the five different ways to configure a vinyl playing stereo setup.
It might be worth it to check out those articles if you are considering getting into vinyl records without breaking the bank. Or if you are ready to leave your beloved all-in-one suitcase-style record player behind and get into standalone gear.
Tip 23: Upgrade your speakers
The speakers are probably the component in your stereo setup that will give the highest return in improved sound quality for every dollar spent on better gear.
As the component in the Hi-Fi chain that transforms the electrical music signal into sound waves in the air, the speakers have a huge effect on the sonic performance of the system.
When it comes to money, ideally half of your budget should be put into the speakers. As a guideline.
And the other half of the budget should be spent on turntable, preamp and amplifier combined. The speakers are the component with the biggest effect on sound quality, and generally the first component to upgrade when looking to improve the sound quality.
If your turntable or amplifier very clearly is the weak link in your stereo, it will obviously make no sense to upgrade the speakers first. But if your stereo components are more or less balanced in quality, the speakers will be a good candidate for your first upgrade.
Tip 24: Upgrade your turntable cartridge
The cartridge plays a huge role in the sonic performance of your vinyl playing stereo. As the component that transforms the mechanical grooves in the record into an electrical music signal, it is one of the most crucial components in your stereo.
Upgrading the cartridge is a good way to improve the sonic performance of your turntable overall. It is also a highly common upgrade to make. Playing around with different cartridges seems to be something that vinyl enthusiasts love to do more than almost anything.
Upgrading the cartridge can also improve tracking (reduce skipping), decrease noise, increase music volume and change the sound characteristics of your turntable from cold to warmer or vice versa.
I have a full article about cartridge upgrades that you can check out here.
Also, always make sure that your cartridge is correctly aligned and have the correct tracking force. Just correcting this if it is out of wack can give a significant upgrade to the sound quality by itself.
Tip 25: Upgrade your phono preamp
This is an upgrade that probably won’t have a huge effect on the sonic performance of your stereo until all the other components (turntable, cartridge and speakers) are of good quality. So this is not the first upgrade to consider if you are a the beginner level.
It will, as an example, not make sense to buy a $200 standalone preamp if you play records on a $100 turntable and a set of $100 powered speakers. Probably goes without saying, but anyway.
But as the phono preamp has the crucial task to RIAA equalize the music signal from the cartridge, there is a lot of electronic circuitry in the phono preamp that impacts the sound quality.
So buying a high-quality standalone phono preamp will improve the sound quality of the stereo setup when we are approaching the high-end segment of stereo components.
Tip 26: Upgrade your amplifier/receiver
It is important to have an amplifier/receiver that can drive your speakers properly.
Some speakers are easy to drive. While others are harder to drive and need a more powerful amplifier to play up to their potential.
A more powerful amplifier will deliver a more precise and punchier bass. As the lower tones are the tones that will test the amplifier’s ability to deliver enough power.
So upgrading the amplifier to improve sonic performance might be a good investment if the one you have is not a good match for your speakers in terms of its power output.
When it comes to sound quality the amplifier/receiver is, however, probably the least important part of the puzzle as long as it is powerful enough to drive the speakers properly.
The cartridge, the speakers and the phono preamp are all components that change the format or character of the music signal. And due to that, they are very crucial parts of the Hi-Fi chain when it comes to sound quality.
The cartridge transforms the physical grooves in the record to an electrical music signal.
The speakers transform the electric signal to physical sound waves.
And the phono preamp significantly alters the tonality of the music signal (RIAA equalization).
The amplifier/receiver, on the other hand, has a much “easier job” to do. Its main task is just to make the music signal bigger and stronger so it can drive the speakers. Hence, it is not the most critical part of the Hi-Fi chain when it comes to sonic performance. As long is it is strong enough to drive the speakers properly.
So spending thousands of dollars on an amplifier/receiver is probably not necessary until you have a turntable and speakers that are well into the stereophile category.
At some point, the amplifier will become the weakest link in your HiFi chain. And is a good candidate for an upgrade. But there are usually other components in your stereo that needs your attention first.
Tip 27: Try Hi-Fi headphones
If you are ok with the idea of listening to vinyl records with headphones, you might be up for a real treat.
Hi-Fi headphones can be the quickest and cheapest way to discover amazing Stereophile proven sound quality from your vinyl records.
I have several “Stereophile” friends with home stereos worth tens and tens of thousands of dollars that actually prefer listening to music using their headphones. Quite expensive headphones I have to add, but anyway…
There are several benefits with headphones.
One. All the potential problems with bad room acoustics suddenly become irrelevant at no sound will bounce around in the room when using headphones.
Two. They are much smaller and therefore cheaper to build than regular speakers.
Three. They don’t need a big heavy powerful amplifier to drive them.
So a pair of high-quality headphones and a decent headphone amplifier will usually cost much less than a quality set of speakers and a quality amplifier/receiver to drive them. But the sonic performance does not have to be compromised.
If you want to read about how to connect headphones to a turntable, I cover that in depth in this article.
End Note
By now you should have an arsenal of tips you can take with you to improve the sound quality from your vinyl records.
You should implement some of them immediately, if you haven’t already done so. Like cleaning your records properly.
Others might be tips you want to put on your list play around with in the future. When you have the time and budget. Like, for example, improving your listening room acoustic or upgrading your gear.
Anyway, I hope there is something on the list for everyone to implement and get value from immediately.
I wish you the best of luck with improving the sound of your vinyl records.
